Video——网页视频的基本样式和基本功能实现
>视频样式裸视频 无法进行任何操作自带进度条、预加载自带进度条、静音播放视频封面自动播放 单循环播放 静音播放基础功能播放、暂停、播放暂停监听事件快进快退音量调整进入、退出全屏,全屏切换事件倍速播放画中画开启画中画关闭画中画开启、关闭画中画的事件视频截图视频播放事件清晰度切换加广告视频帧预览步骤视频帧预览实现代码c#每隔5秒截取一张图片列表帧预览弹幕功能完整代码
视频样式
裸视频 无法进行任何操作
<video src="https://github.com/logerlink/JSvideoDemo/blob/main/video/111-360.mp4?raw=true" width="500">您的浏览器不支持 video 标签。</video>自带进度条、预加载
进度条:controls="controls" 准确来说应该是视频控制台,因为控制台包含进度条,单进度条会比较好理解一点
预加载:preload="preload" 感觉没什么用
禁用画中画:disablePictureInPicture="true" 默认为false
xxxxxxxxxx<video src="https://github.com/logerlink/JSvideoDemo/blob/main/video/111-360.mp4?raw=true" controls="controls" width="500" preload="preload" disablePictureInPicture="true">您的浏览器不支持 video 标签。</video>自带进度条、静音播放
进度条:controls="controls"
静音播放:muted="muted"
xxxxxxxxxx<video src="https://github.com/logerlink/JSvideoDemo/blob/main/video/111-360.mp4?raw=true" controls="controls" width="500" muted="muted">您的浏览器不支持 video 标签。</video>视频封面
设置视频封面:poster="https://github.com/logerlink/JSvideoDemo/blob/main/image/fengmian.jpg?raw=true"
xxxxxxxxxx<video src="https://github.com/logerlink/JSvideoDemo/blob/main/video/111-360.mp4?raw=true" width="500" poster="https://github.com/logerlink/JSvideoDemo/blob/main/image/fengmian.jpg?raw=true" >您的浏览器不支持 video 标签。</video>自动播放 单循环播放 静音播放
自动播放:autoplay="autoplay"
循环播放:loop="loop"
静音播放:muted
xxxxxxxxxx<video src="https://github.com/logerlink/JSvideoDemo/blob/main/video/111-360.mp4?raw=true" width="500" autoplay="autoplay" loop="loop" muted>您的浏览器不支持 video 标签。</video>更多属性及功能:HTML Video 标签 (w3school.com.cn)
值得注意的是controls、preload、muted、autoplay、loop的值是它本身,如设置视频静音播放我们可以设置为:muted="muted" 或者 muted 都是正确的,但是 muted="true" 或者 muted="false" 是错误的。通常设置true或者false默认都是muted,即都是静音.
基础功能
播放、暂停、播放暂停监听事件
当我们播放视频、停止视频时往往需要进行一些操作,这些操作建议都放在play、pause事件中处理。
let video = document.querySelector('video')//播放video.play()//暂停video.pause()
//监听视频播放状态video.addEventListener('play',()=>{    console.log('视频正在播放')})//监听视频停止状态video.addEventListener('pause',()=>{    console.log('视频已停止')})
快进快退
let video = document.querySelector('video')//快进5秒video.currentTime += 5//快退5秒video.currentTime -= 5//视频进度定位到50秒video.currentTime = 50音量调整
音量的值在[0-1]区间
xxxxxxxxxxlet video = document.querySelector('video')//音量+if(video.volume <1) video.volume = ((video.volume * 100) + 1)/100//音量减if(video.volume >0) video.volume = ((video.volume * 100) - 1)/100//静音 设为0就好了video.volume = 0进入、退出全屏,全屏切换事件
xxxxxxxxxxlet video = document.querySelector('video')let videoWrapper = document.querySelector('.wrapper-video')// 全屏监听videoWrapper.addEventListener('fullscreenchange', e => {    console.log(document.fullscreenElement)    if(document.fullscreenElement) console.log("目前是全屏状态")    else console.log("目前是非全屏状态")})//进入全屏enterFS(videoWrapper)//退出全屏exitFS()
//j进入全屏function enterFS(element) {    if (element.requestFullscreen) {        element.requestFullscreen();    } else if (element.msRequestFullscreen) {        element.msRequestFullscreen();    } else if (element.mozRequestFullScreen) {        element.mozRequestFullScreen();    } else if (element.webkitRequestFullscreen) {        element.webkitRequestFullscreen();    }}//退出全屏function exitFS() {    //一个页面只有一个全屏  所以直接用document对象关闭全屏即可    if (document.exitFullscreen) {        document.exitFullscreen();    } else if (document.msExitFullscreen) {        document.msExitFullscreen();    } else if (document.mozCancelFullScreen) {        document.mozCancelFullScreen();    } else if (document.webkitExitFullscreen) {        document.webkitExitFullscreen();    }}
html:
xxxxxxxxxx<div class="wrapper-video"> <video src="https://github.com/logerlink/JSvideoDemo/blob/main/video/111-360.mp4?raw=true" width="1280"> 您的浏览器不支持 video 标签。 </video> <!--弹幕--> <!--自定义控制台--></div>值得注意:
1.html可以指定某个元素进入全屏。当我们请求浏览器全屏时,我们将该用videoWrapper元素来请求进入全屏,而不仅仅是video元素。
因为当浏览器进入全屏时,该元素会得到最高级,这时候就算其他元素设置z-index为最大值也无法展示在页面上(被全屏的元素遮住了)。所以如果我们只是用video元素请求进入全屏,那么除了视频其他自定义的内容(弹幕、自定义控制台)都不能一同携带到全屏中(无法正常显示)。
2.当我们进入全屏状态或者退出全屏状态时往往需要进行一些操作,这些操作建议都放在fullscreenchange 事件中处理。
3.当我们使用自定义进度条且进入全屏时,这时候默认的进度条就会出现了,我们需要用css将默认的进度条隐藏。当然这个问题的出现也是因为我们只用video元素来请求进入全屏的原因。
/* //全屏按钮 */ video::media-controls-fullscreen-button { display: none; } /* //播放按钮 */ video::media-controls-play-button { display: none; } /* //进度条 */ video::media-controls-timeline { display: none; } /* //观看的当前时间 */ video::media-controls-current-time-display{ display: none; } /* //剩余时间 */ video::media-controls-time-remaining-display { display: none; } /* //音量按钮 */ video::media-controls-mute-button { display: none; } video::media-controls-toggle-closed-captions-button { display: none; } /* //音量的控制条 */ video::media-controls-volume-slider { display: none; } /* //所有控件 */ video::media-controls-enclosure{ display: none; }倍速播放
速度值在[0-16]区间 超过这个区间会报错
let video = document.querySelector('video')//5倍速播放video.playbackRate = 5//0.5倍速播放(慢放)video.playbackRate = 0.5画中画
开启画中画
开启前需要判断视频是否支持画中画。否则调用requestPictureInPicture方法时会报错,在video标签中加上disablePictureInPicture="true"属性即可禁用画中画
let video = document.querySelector('video')if(video.disablePictureInPicture){ alert('该视频不支持画中画') //disablePictureInPicture="true" return}//画中画对象const pipWindow = await video.requestPictureInPicture()console.log(pipWindow)关闭画中画
一个浏览器只能有一个画中画,所以直接用document对象关闭即可。关闭前也要判断该页面是否存在画中画,否则调用exitPictureInPicture方法时会报错
if(!document.pictureInPictureElement){ //There is no Picture-in-Picture element in this document alert('该页面不存在画中画') return}document.exitPictureInPicture()开启、关闭画中画的事件
当我们进入画中画模式或者退出画中画模式时往往需要进行一些操作,这些操作建议都放在enterpictureinpicture、leavepictureinpicture事件中处理。
let video = document.querySelector('video')//进入了画中画模式,可以拿到 pipWindow 对象video.addEventListener('enterpictureinpicture', function(pipWindow) { console.log('进入画中画模式')})//退出了画中画模式video.addEventListener('leavepictureinpicture', function() { console.log('退出画中画模式')})视频截图
通过drawImage将视频绘制到canvas上,再通过toDataURL获得图片的base64地址,再将这个地址赋给图片即可
let video = document.querySelector('video')//创建一个画布let canvas = document.createElement("canvas")//按比例缩小let scale = 0.25canvas.width = video.videoWidth * scalecanvas.height = video.videoHeight * scalecanvas.getContext('2d')    .drawImage(video, 0, 0, canvas.width, canvas.height)//修改img的地址 并展示再网页上  我们通过右键即可保存到本地let img = document.querySelector(".img-cut")if(!img){    img = document.createElement('img')    img.classList.add('img-cut')    document.querySelector('body').append(img)}img.src = canvas.toDataURL('image/png')img.width = canvas.width
//截图成功后保存到本地 将下面的注释解开就好了// var a = document.createElement('a')// var event = new MouseEvent('click')// // 下载名称// a.download = name || '视频截图'// // 将生成的URL设置为a.href属性// a.href = img.src// // 触发a的单击事件// a.dispatchEvent(event)
视频播放事件
xxxxxxxxxxlet video = document.querySelector('video')
//进度条(currentTime)变更前video.onseeking = function(){    console.log('seek执行前')}
//每次播放都触发一次  进度条变更(currentTime)也会触发一次video.onplaying = function () {    console.log('开始播放')         }
//进度条(currentTime)变更后video.onseeked = function(){    console.log('seek执行后')}
//更改当前时间  持续触发    1秒触发4次左右video.ontimeupdate = function () {    console.log('播放中')}
//视频播放结束时触发video.addEventListener('ended',function(){    console.log('视频播放结束')})
//监听视频播放状态 在onplaying事件前触发video.addEventListener('play',()=>{    console.log('视频正在播放')})
//监听视频停止状态 在ended事件前触发video.addEventListener('pause',()=>{    console.log('视频已停止')})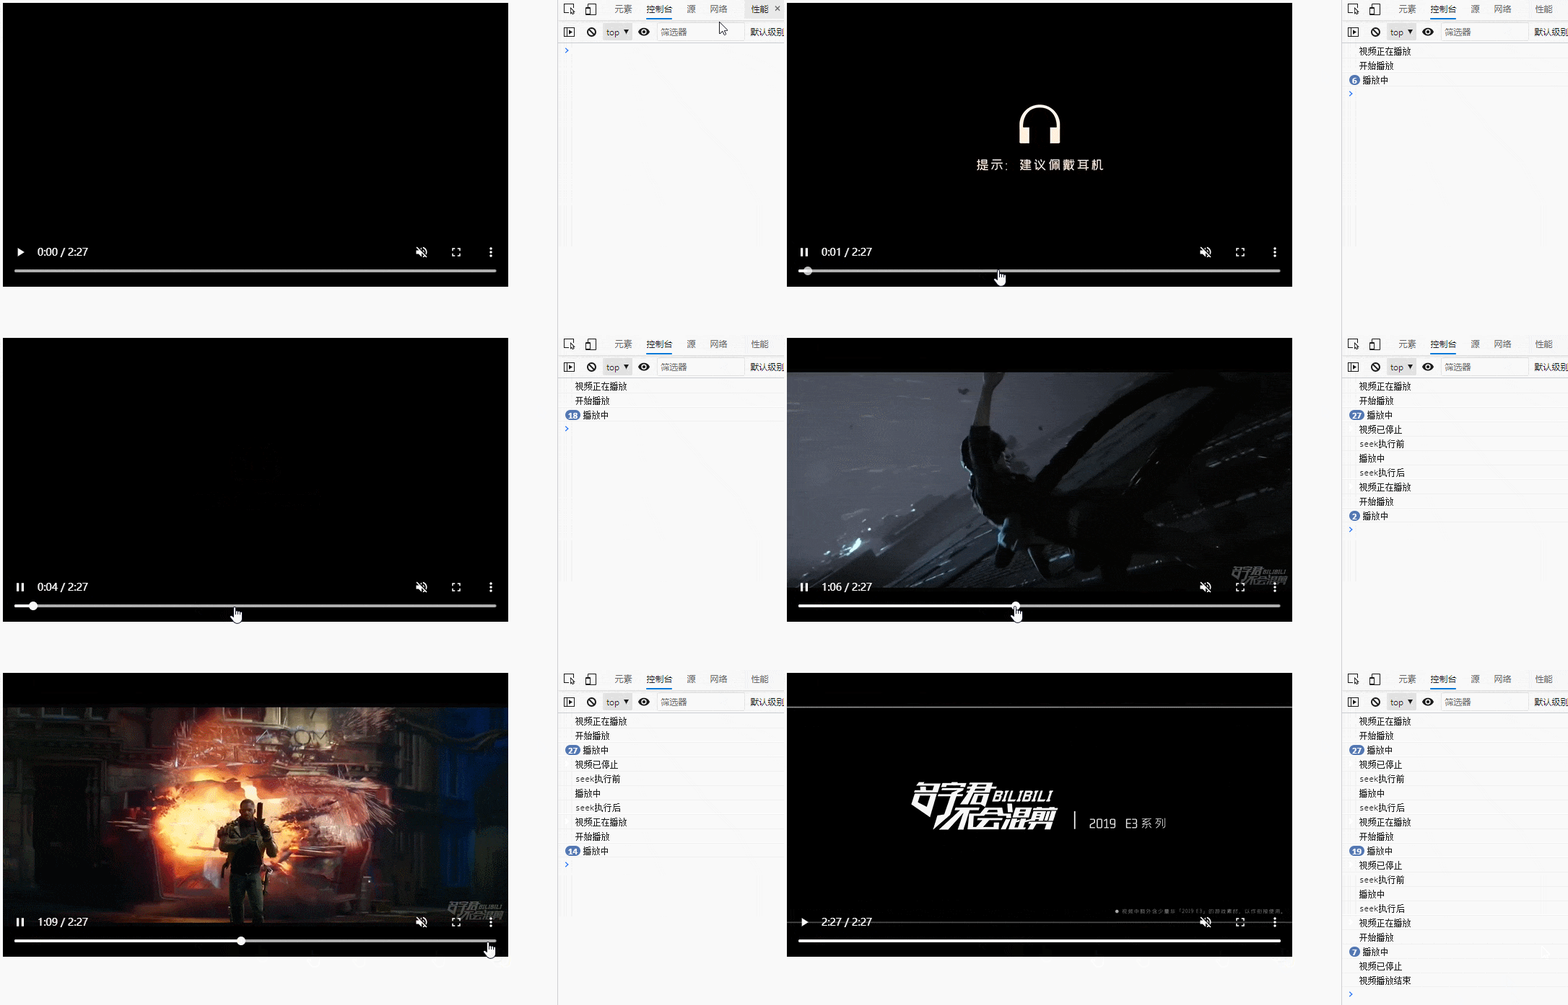
更多事件请参考:video 属性和事件用法大全 - rogerwu - 博客园 (cnblogs.com)
清晰度切换
换视频源:如要将视频A切换到视频B,视频A停止,记住A的播放时间(currentTime),通过src变更为视频B,将B的播放时间设置为A的播放时间
xxxxxxxxxx//视频质量调整let video = document.querySelector('video')//视频源 let dic = { '0':'https://github.com/logerlink/JSvideoDemo/blob/main/video/111-360.mp4?raw=true', '1':'https://github.com/logerlink/JSvideoDemo/blob/main/video/111-720.mp4?raw=true'}//要切换到哪个视频源let squalityStr = document.querySelector('.select-quality').value || '0'let currentTime = video.currentTime//调整回原始宽高let width = video.offsetWidthlet height = video.offsetHeightvideo.width = widthvideo.height = height//切换视频源video.src = dic[squalityStr]//加载视频并将播放时间设置为上次播放时间video.load()video.currentTime = currentTimevideo.autoplay = 'autoplay'//切换后视频停止 所以要手动播放video.play()加广告
和清晰度切换逻辑差不多。唯一不同是要在广告视频结束后将原视频激活
xxxxxxxxxxlet video = document.querySelector('video')let srcOld = video.srclet currentTimeOld = video.currentTime//切到广告视频并播放video.src = './video/ad.mp4'video.play()video.addEventListener('ended',()=>{ //播放完广告后切回原视频并播放 video.src = srcOld video.currentTime = currentTimeOld video.play()})<!-- 去广告,f12执行即可
xxxxxxxxxxlet time = 0let timer = setInterval(()=>{ aa = document.querySelectorAll('video') for(let i =0;i<aa.length;i++) { aa[i].currentTime += 5 if(aa[i].duration > 120) { clearInterval(timer) aa[i].currentTime += 10 } }},200)-->
视频帧预览
步骤
1.自定义视频进度条 input type="range"
2.视频每隔5秒截取一张图片得到多张图片,使用ffmpeg工具
3.将多张图片合并为一张大图,如下图
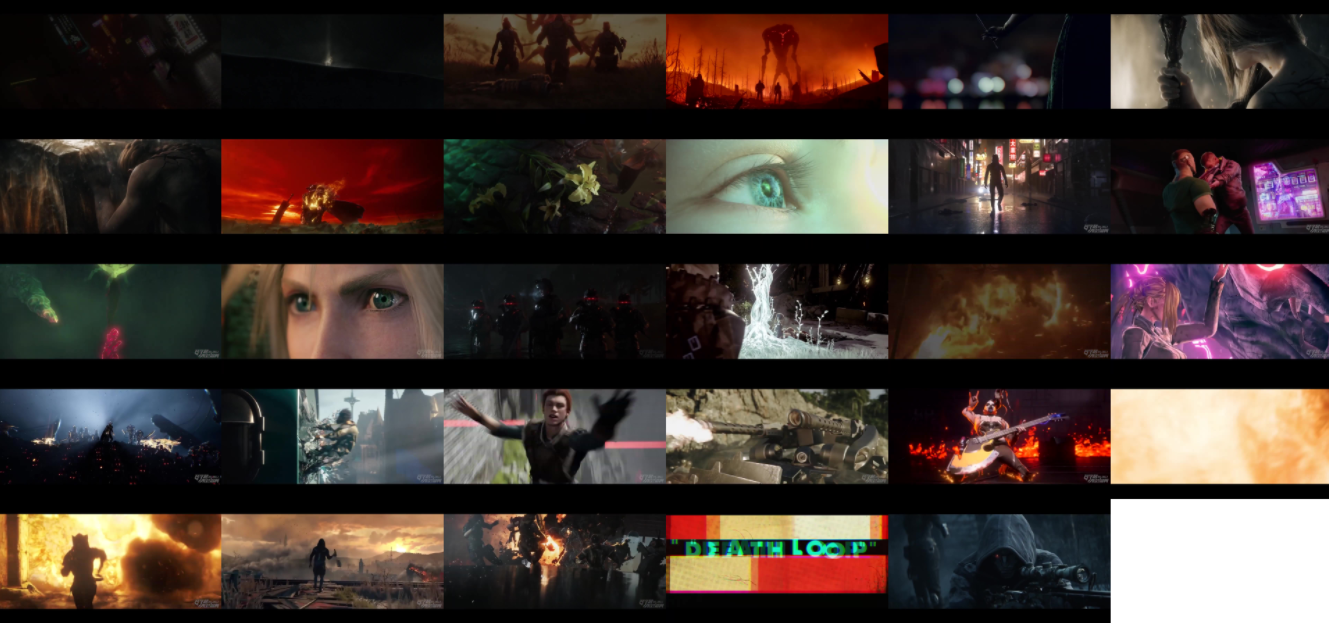
4.将这张大图设为预览图的背景图
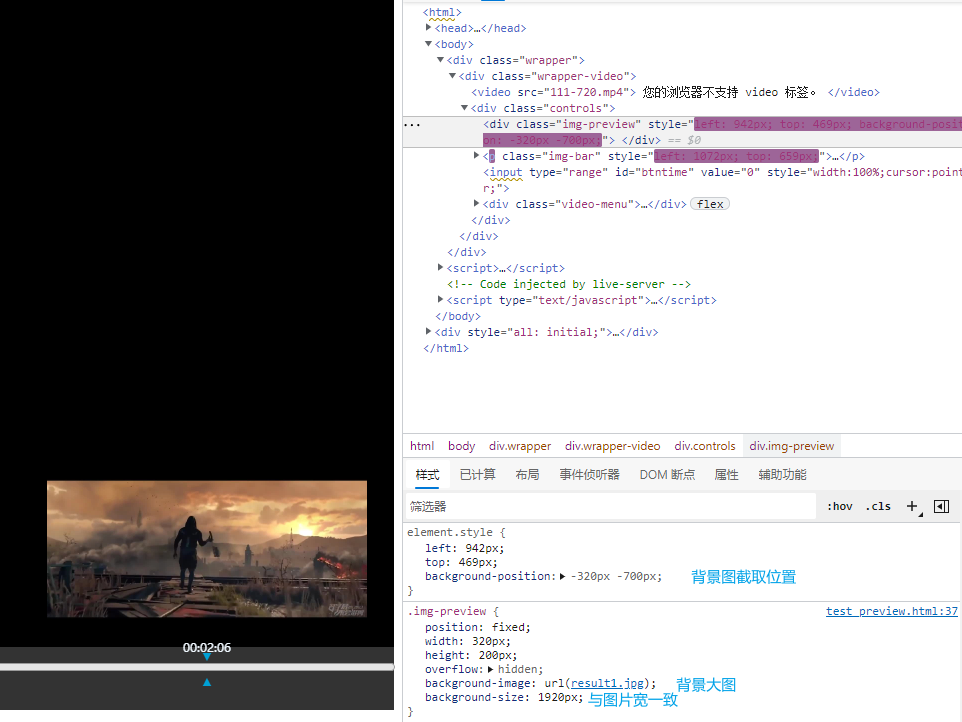
5.进度条添加鼠标事件,通过鼠标位置(x坐标)获取当前鼠标位置的视频播放时间(currentTime),再通过这个时间截取背景图
视频帧预览实现代码
xxxxxxxxxx<html>    <style>            </style>    <style>    html,body{        padding: 0;        margin: 0;    }    .wrapper{        margin: 20px auto;        width: 1280px;    }    .wrapper-video{        position: relative;    }    /* canvas不能这样定宽高 */    .wrapper-canvas{        width: 100%;        height: 95%;        position: absolute;        left: 0;    }    .controls{        width: 100%;        position: absolute;        bottom: 0;        padding: 10 0;        background: #333;        color:aliceblue;        z-index: 2147483648;    }    .controls .video-menu{display: flex;margin: 0 5;}    .controls .video-menu .menu-item{        flex: 1;    }    .img-preview{        position: fixed;        width: 320px;        height: 200px;        overflow: hidden;        background-image: url('https://github.com/logerlink/JSvideoDemo/blob/main/image/result1.jpg?raw=true');  /*视频预览图 */        background-size: 1920px;    }    .img-bar{        position: fixed;        width: 60px;        height: 20px;        cursor: pointer;        font-size: 10px;        text-align: center;    }    .img-bar::after{        content: '▼';        position: absolute;        bottom: -5px;        left: 50%;        transform: translateX(-50%);        color: #00a1d6;    }    .img-bar::before{        content: '▲';        position: absolute;        bottom: -30px;        z-index: 10000000;        left: 50%;        transform: translateX(-50%);        color: #00a1d6;    }    .hidden{        display: none;        translate: all 1s;    }    .hidden{display: none;}    </style>    <body>        <div class="wrapper">            <div class="wrapper-video">                <video src="https://github.com/logerlink/JSvideoDemo/blob/main/video/111-360.mp4?raw=true" width="1280">                    您的浏览器不支持 video 标签。                </video>                <div class="controls">                    <div class="img-preview hidden">                    </div>                    <p class="img-bar hidden">2222</p>                    <input type="range" id="btntime" value="0" style="width:100%;cursor:pointer;" />                    <div class="video-menu">                        <div class="menu-item">                            <button class="btn-play" onclick="videoCmd(this)" data-cmd="play">播放</button>                            <button class="btn-pause" onclick="videoCmd(this)" data-cmd="pause">停止</button>                            <span id="current_time" style='font-size: 12px;'>00:00:00</span>                            <span style="margin: 5 0;">/</span>                            <span id="totaltime" style='font-size: 12px;'>00:00:00</span>                        </div>                    </div>                </div>            </div>        </div>        <script>            let video = document.querySelector('video')            let video_bar = document.querySelector('#btntime')            if(video.paused) document.querySelector('.btn-pause').style.display = 'none'            else document.querySelector('.btn-play').style.display = 'none'
            window.onload=function(){                //每次播放都触发一次  进度条变更(currentTime)也会触发一次                video.onplaying = function () {                    totaltime.innerHTML=getVideoTimeFormat(video.duration)                };
                //更改当前时间  持续触发    1秒触发4次左右                video.ontimeupdate = function () {                    let btntime = document.querySelector('#btntime')                    btntime.value = 100*this.currentTime/this.duration  ///this.totaltime;                    current_time.innerHTML= getVideoTimeFormat(this.currentTime)                }
                //监听视频状态                video.addEventListener('play',()=>{                    toggleDisplay('.btn-pause','.btn-play')                                    })                //监听视频状态                video.addEventListener('pause',()=>{                    toggleDisplay('.btn-play','.btn-pause')                })                 //移动进度条的事件                video_bar.addEventListener("click",function(){                    video.currentTime=this.value*video.duration/100;                })            }                        //获取视频时间格式            function getVideoTimeFormat(time){                var h=Math.floor(time/3600);                var m=Math.floor(time%3600/60);                var s=Math.floor(time%60);                h=h>=10?h:'0'+h;                m=m>=10?m:'0'+m;                s=s>=10?s:'0'+s;                return h+':'+m+':'+s;            }                        //悬浮进度条的事件            video_bar.addEventListener("mouseover",function(){                this.addEventListener('mousemove',GetPicBycurrentTime)                this.addEventListener('mouseout',function(){                    //鼠标移出 隐藏悬浮框                    imgPreview.classList.add('hidden')                    imgBar.classList.add('hidden')                    this.removeEventListener('mousemove',null)                })            })            //悬浮的预览图            let imgPreview = document.querySelector('.img-preview')            //悬浮的进度条            let imgBar = document.querySelector('.img-bar')            //图片宽高            const imgPreviewWidth = 320            const imgPreviewHeight = 175            //鼠标的x位置再减掉                 const imgPreviewLeft = imgPreviewWidth/2    // width/2            //鼠标的y位置再减掉     //视频预览图每一张照片的高度            const imgPreviewTop = 220                 //根据当前视频进度获取预览图            function GetPicBycurrentTime(e){                let videoBarWidth = video_bar.offsetWidth                imgPreview.classList.remove('hidden')                let rect = video_bar.getBoundingClientRect()                let left = e.clientX - imgPreviewLeft                let rectWidth = rect.width - imgPreviewWidth + rect.x - 2 //2偏差                if(left > rectWidth) left = rectWidth   //预览图不超出进度条右边                else if(left < rect.x) left = rect.x    //预览图不超出进度条左边                else if(left <0) left = 0                imgPreview.style.left = left                imgPreview.style.top = rect.top - imgPreviewTop                let x = e.clientX - rect.x  //减去进度条与浏览器左边的距离  不减的话获取当前视频播放时间不准确                let now = Math.ceil(x * video.duration / videoBarWidth)                let point = getPoint(now,timeSpacePreview)                //预览图截取背景图位置                imgPreview.style.backgroundPosition = `-${point.x}px -${point.y}px`                //光标位置                imgBar.classList.remove('hidden')                imgBar.style.left = e.clientX - 30                imgBar.style.top = rect.top - 30                imgBar.innerText = getVideoTimeFormat(now)            }                        //间隔时间  隔5秒截一张图片            const timeSpacePreview = 5            //间隔时间  隔10秒截一张图片            const timeSpaceCover = 10            //一行图片数量            const imgRowCount = 6            //根据当前时间获取图片的裁剪坐标            function getPoint(nowTime,timeSpace){                var allCount = Math.floor(video.duration / timeSpace)                //一行最大的总时间                const rowMaxTime = timeSpace * imgRowCount                let row = Math.floor(nowTime / rowMaxTime)                let cell = Math.floor((nowTime - (row * rowMaxTime)) / timeSpace)                // cell = cell <0?0:cell                let nowCount = (row * imgRowCount) + cell                if(nowCount >= allCount) {                    //避免最后几秒出现空白                     cell --;                }                                let x = cell * imgPreviewWidth                let y = row * imgPreviewHeight                let index = row * cell                return {x,y}            }
            let coverPreview = document.querySelector('.video-cover .cover-preview')            let coverBar = document.querySelector('.video-cover .cover-bar')                        //视频主动事件            function videoCmd(e){                cmd(e.dataset.cmd)            }            async function cmd(key){            if(key == 'play'){                video.play()            }            else if(key == 'pause') {                video.pause()            }        }                //切换显示、隐藏状态        function toggleDisplay(showEl,hideEl){            document.querySelector(hideEl).style.display = 'none'            document.querySelector(showEl).style.display = 'inline-block'        }        </script>    </body></html>
c#每隔5秒截取一张图片
xxxxxxxxxx        #region 合并预览图片        [Test]        public async Task GetPreviewImageAsync()        {            var guid = await GetImgsByFfmpegAsync(VideoPath, DirPath, FFmpegPath, 147, 5);            CombinImage(guid, DirPath, "视频预览图.jpg", true);            CombinImage(guid, DirPath, "封面预览图.jpg", false);     //封面预览图只取一小部分图片来合并即可            CombinGif(guid, DirPath, "封面预览图.gif", false);               }
        /// <summary>        /// 提取视频多帧(每隔timeSpace 秒截取一张图片)        /// </summary>        /// <param name="videoPath">原始视频的位置</param>        /// <param name="outDirPath">截取图片输出的位置</param>        /// <param name="ffmpegPath">ffmpeg exe的位置 F:\\xxx\\bin\\ffmpeg.exe</param>        /// <param name="duration">视频总时长  单位:s</param>        /// <param name="timeSpace">间隔时间 单位:s</param>        /// <returns></returns>        private async Task<string> GetImgsByFfmpegAsync(string videoPath, string outDirPath, string ffmpegPath, int duration, int timeSpace)        {            //视频时长 秒   应该通过前端传入或者自动读取视频时长            var guid = Guid.NewGuid().ToString();            var inputFile = new InputFile(videoPath);            var pathFormat = outDirPath + guid + "{0}.jpg";            //安装包:FFmpeg.NET            var ffmpeg = new Engine(ffmpegPath);            for (int i = timeSpace; i < duration;)            {                var outputPath = string.Format(pathFormat, i);                var outputFile = new OutputFile(outputPath);                //设置 CustomWidth 与 CustomHeight 无效  应该在合并的时候设置宽高                var options = new ConversionOptions { Seek = TimeSpan.FromSeconds(i), CustomWidth = 240, CustomHeight = 110 };                await ffmpeg.GetThumbnailAsync(inputFile, outputFile, options);                i += timeSpace;            }            //视频时长 秒   应该通过前端传入或者自动读取视频时长            return guid;        }
        /// <summary>        /// 将多张图片按顺序排列合并为一张大图        /// </summary>        /// <param name="guid">标识</param>        /// <param name="name">输出文件名</param>        /// <param name="isAll">是否全合  false只取一半</param>        private void CombinImage(string guid, string outDirPath, string name, bool isAll = true)        {            var reg = new Regex(guid + "(\\d+)");            //根据标识获取图片 并排序            var files = Directory.GetFiles(outDirPath, ".", SearchOption.AllDirectories).Where(x => x.Contains(guid)).ToList();            if (!isAll) files = files.Where((item, index) => (index != 0 && index % 2 == 0)).ToList();            var fileObj = files.Select(x =>            {                var match = reg.Match(x);                if (match.Success) return new { name = x, num = match.Groups[1].Value };                return null;            })                                .Where(x => x != null)                                .ToList();
            var fileOrders = fileObj.OrderBy(x => int.Parse(x.num)).Select(x => x.name).ToList();            //拼接画布并保存为图片            const int width = 1920;            const int height = 1080;            // 初始化画布(最终的拼图画布)并设置宽高            Bitmap bitMap = new Bitmap(width, height);            // 初始化画板            Graphics g1 = Graphics.FromImage(bitMap);            // 将画布涂为白色(底部颜色可自行设置)            g1.FillRectangle(Brushes.White, new Rectangle(0, 0, width, height));            double widthNow = 0;            double heightNow = 0;            double widthFix = 320;            foreach (var file in fileOrders)            {                Image img = Image.FromFile(file);                var scale = Math.Round(widthFix / img.Width, 2);                var scaleHeight = Math.Round(img.Height * scale, 2);                if (widthNow > 0) widthNow += widthFix;                if (widthNow > width)                {                    widthNow = 0;                    heightNow += scaleHeight;                }                //在x=0,y=0处画上图一                g1.DrawImage(img, (int)widthNow, (int)heightNow, (int)widthFix, (int)scaleHeight);                img.Dispose();                if (widthNow <= 0) widthNow += 0.1;    //解决第一个为空白的问题            }            Image imgSave = bitMap;            //保存            imgSave.Save(outDirPath + name);            imgSave.Dispose();        }
        /// <summary>        /// 将多张图片按顺序排列合并为一张gif动图        /// </summary>        /// <param name="guid"></param>        /// <param name="outDirPath"></param>        /// <param name="name"></param>        /// <param name="isAll"></param>        private void CombinGif(string guid, string outDirPath, string name,bool isAll = true)        {            var reg = new Regex(guid + "(\\d+)");            var files = Directory.GetFiles(outDirPath, ".", SearchOption.AllDirectories).Where(x => x.Contains(guid)).ToList();            files = files.Where((item, index) => (index != 0 && index % 2 == 0)).ToList();            var fileObj = files.Select(x =>            {                var match = reg.Match(x);                if (match.Success) return new { name = x, num = match.Groups[1].Value };                return null;            })                                .Where(x => x != null)                                .ToList();
            var fileOrders = fileObj.OrderBy(x => int.Parse(x.num)).Select(x => x.name).ToList();            //图片宽            double widthFix = 300;            //安装包:Magick.NET-Q16-AnyCPU            using (var collection = new MagickImageCollection())            {                for (int i = 0; i < fileOrders.Count; i++)                {                    collection.Add(fileOrders[i]);                    var imgTemp = collection[i];                    //collection[i].Flip();                    var scale = Math.Round(widthFix / imgTemp.Width, 2);                    var scaleHeight = Math.Round(imgTemp.Height * scale, 2);                    imgTemp.Resize((int)widthFix, (int)scaleHeight);                    imgTemp.AnimationDelay = 100;   //ms                }                var settings = new QuantizeSettings();                settings.Colors = 256;                collection.Quantize(settings);                collection.Optimize();                // Save gif                collection.Write(outDirPath + name);            }        }
        #endregion
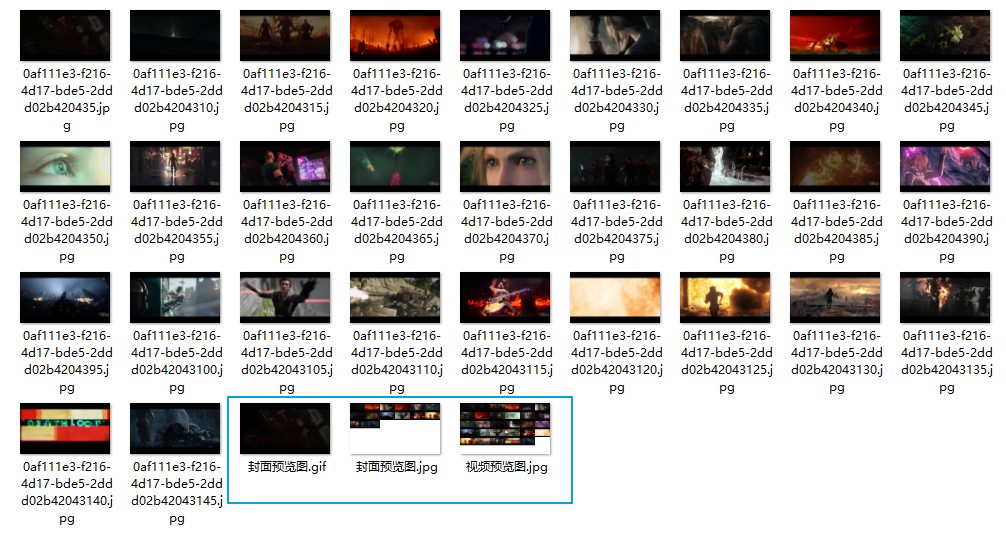
生成视频预览图、封面预览图、封面预览动图
列表帧预览
与视频帧预览逻辑一致,不过如果想要简单一点可以直接用gif动图来代替
xxxxxxxxxx<html>    <style>    html,body{        padding: 0;        margin: 0;    }    .wrapper{        margin: 20px auto;        width: 1280px;    }    .hidden{        display: none;        translate: all 1s;    }    .video-cover,.video-cover-gif{        width: 320px;        height: 180px;        position: relative;        cursor: pointer;
    }    .video-cover img,.video-cover-gif img{        width: 100%;    }    .cover-preview{        width: 100%;        height: 100%;        position: absolute;        top: 0;        overflow: hidden;         background-image: url('https://github.com/logerlink/JSvideoDemo/blob/main/image/resultSimple.jpg?raw=true');  /*封面预览图 */        background-size: 1920px;        opacity: 0;        z-index: -1;        transition: opacity ease 1s;    }    .cover-preview .cover-bar{        width: 100%;        height: 5px;    }    .video-list{        display: flex;    }    .video-list-item{        margin: 10px 20px;    }    </style>    <body>        <div class="wrapper">            <div class="video-list">                <div class="video-list-item">                    <h2>列表帧预览1</h2>                    <div class="video-cover">                        <img src="https://github.com/logerlink/JSvideoDemo/blob/main/image/fengmian.jpg?raw=true" />                        <!--做的好一点的话  cover-preview应该放在外面的  但是放在外面鼠标移动事件不好控制,一闪一闪的-->                        <div class="cover-preview">                            <input type="range" class="cover-bar"/>                        </div>                    </div>                </div>                <div class="video-list-item">                    <h2>列表Gif</h2>                    <div class="video-cover-gif">                        <img src="https://github.com/logerlink/JSvideoDemo/blob/main/image/cover.gif?raw=true" />                    </div>                </div>                <div class="video-list-item">                    <h2>列表帧预览2</h2>                    <div class="video-cover">                        <img src="https://github.com/logerlink/JSvideoDemo/blob/main/image/fengmian.jpg?raw=true" />                        <div class="cover-preview">                            <input type="range" class="cover-bar"/>                        </div>                    </div>                </div>            </div>                    </div>
        <script>            const videoDuration = 147            //图片宽高            const imgPreviewWidth = 320            const imgPreviewHeight = 175
            //间隔时间  隔5秒截一张图片            const timeSpacePreview = 5            //间隔时间  隔10秒截一张图片            const timeSpaceCover = 10            //一行图片数量            const imgRowCount = 6            //根据当前时间获取图片的裁剪坐标            function getPoint(nowTime,timeSpace){                var allCount = Math.floor(videoDuration / timeSpace)                //一行最大的总时间                const rowMaxTime = timeSpace * imgRowCount                let row = Math.floor(nowTime / rowMaxTime)                let cell = Math.floor((nowTime - (row * rowMaxTime)) / timeSpace)                // cell = cell <0?0:cell                let nowCount = (row * imgRowCount) + cell                if(nowCount >= allCount) {                    //避免最后几秒出现空白                     cell --;                }                                let x = cell * imgPreviewWidth                let y = row * imgPreviewHeight                let index = row * cell                return {x,y}            }
            let videoCoverImgs = document.querySelectorAll('.video-cover')            let coverPreviews = document.querySelectorAll('.cover-preview')            let coverBars = document.querySelectorAll('.cover-preview .cover-bar')                        for (let index = 0; index < videoCoverImgs.length; index++) {                const videoCoverImg = videoCoverImgs[index]                const coverPreview = coverPreviews[index]                const coverBar = coverBars[index]                videoCoverImg.addEventListener('mouseover',function(){                    coverPreview.style.zIndex = 2                    coverPreview.style.opacity = 1                    this.addEventListener('mousemove',(e)=>{                        let rect = videoCoverImg.getBoundingClientRect()
                        let x = e.clientX - rect.x                        let now = Math.ceil(x * videoDuration / videoCoverImg.offsetWidth)                        let point = getPoint(now,timeSpaceCover)                        //展示封面预览图 及设置进度条的值                        coverPreview.style.backgroundPosition = `-${point.x}px -${point.y}px`                        coverBar.value = 100* now/videoDuration                    })                    this.addEventListener('mouseout',function(){                        //隐藏封面预览图 及初始化进度条                        coverPreview.style.zIndex = -1                        coverPreview.style.opacity = 0                        coverBar.value = 0                    })                })            }                        //切换显示、隐藏状态            function toggleDisplay(showEl,hideEl){                document.querySelector(hideEl).style.display = 'none'                document.querySelector(showEl).style.display = 'inline-block'            }        </script>    </body></html>
弹幕功能
参考:html5 canvas+video实时弹幕&添加弹幕功能 - 简书 (jianshu.com)
requestAnimationFrame详解 - 简书 (jianshu.com)
xxxxxxxxxx<html> <style> html,body{ padding: 0; margin: 0; } .wrapper{ margin: 20px auto; width: 1280px; } .wrapper-video{ position: relative; } /* canvas不能这样定宽高 */ .wrapper-canvas{ width: 100%; height: 90%; /*如果底部的控制台点击不了 有可能是canvas遮挡住了视频,调小一点高度即可 */ position: absolute; left: 0; } </style> <body> <div class="wrapper"> <div class="wrapper-video" > <video src="https://github.com/logerlink/JSvideoDemo/blob/main/video/111-360.mp4?raw=true" width="1280" controls="controls"> 您的浏览器不支持 video 标签。 </video> <canvas class="wrapper-canvas"> 您的浏览器不支持canvas标签。 </canvas> </div> </div>
<script> //实时弹幕 const text1 = "万表名匠全国手表维,修诚信平台,隶属于万表集团,优选全国超800家优质手,表维修商家入驻,40万用户信赖,报价透明,顺丰免费,上门,为用户提供线上线下一条龙的优质,手表维,修保养体验,普通的手表有两三千的,也有两三万的,但是有的名表动辄几十万上百万,为什么价格会相差那么多呢?,名表为何如此昂贵?,下面杭州手表售后维修点就给大家来介,绍一下为什么名表总是价格不菲的原因:,手表在早年可能只是作为单纯的计时工具,经过时代的变迁,手表的主要计时功,能已经弱化了,现在更多地作为一种饰品展现在人们面前,非凡,的造型设计和名贵的珠宝镶嵌让一些品牌手表已经成为了名副其实的奢侈品,瑞士人口中流传这样一句话:,手表是最少,的原料,最高的工艺,然后是最贵的价格,除了手表使用的材质比,较高档以外,决定价格的主要还有手表的品牌,而工艺事实上只影响它的成本,为什么那么多人都喜欢百达翡丽,江诗丹顿,等手表品牌,他们都属于世界顶级的名表品牌,品牌很多时候已,经是一种级别差距,举个例子,就像自动日历全钢表壳表带的男表,款差相似,万国的价格可能在2万6左右,帝舵和欧米茄价,格在1万3左右,而浪琴的只要8千,天梭则4千就能购买到,虽然,大家的机芯都是ETA的,这个时候品牌的价值影响就非常大了,当然,品牌本身的工艺也是有一定区别的,但前面有说过,工艺,只影响成本,在市场价格定位上不会有过多影响,像伯爵这样,的大品牌手表,年产量并不大,价格大多在10万以上,是真正的昂贵名表,当然,决定手表价格因素的还有它的产地,主要影响,到一些非奢侈品级别的手表品牌,手表的主要生产国有:瑞士,、德国、日本、俄国、中国,受人们认可度最高的事瑞士生产,因此SWISS MADE是手表质量的一个标签,只有真正的瑞士生,产的手表,包括一部分德国产的手表才能卖上高价,其他国家,产的手表较多为中低档,价格比较亲民,2021年,抖音日活目标锚定6.8亿后,同属字节系旗下、“App工厂”曾经的王牌产,品今日头条,也开始发力,Tech星球独家获悉,今日头条将开辟,新战场,为此成立了两个新业务团队,一个团队将参与打造定位高端的资讯平台和智能阅读工具,业务/产品名叫做“识区”,为用户提供金融、科技、军事等专业资讯内容,并进行文章的,智能推送,同时,用户可以进行社交互动,包括点赞评论等,目前,“识区”在内部进行网页端的测试,Slogan为“定义你,的阅读宇宙”,今日头条新战场的另外一个业务团队为浏览器团,队,一位消息人士向Tech星球透露,今日头条将重启“悟空”的名字,用来命名新浏览器业务,暂定为“悟空浏览器”,浏览,器内设有单独的搜索引擎,目前,已组建一个浏览器团队,计,划打造“悟空浏览器”,其中还会搭配独立研发的“悟空搜索(搜)”,该知情人士还透露,悟空浏览器的业务团队为今日头,条成立的全新业务团队,独立于头条搜索,后期的目标为千万,级DAU产品,这也意味着,悟空搜索将成为字节继抖音搜索、头条搜索后的又一款全新的搜索引擎,在功能上,悟空浏览器,强调智能搜索,Tech星球就上述独家信息,向字节跳动,方面求证,字节跳动表示:“识区”为高端(小众)资讯平台——智能阅读工具;而对于悟空浏览器这个新业务,截止发稿前,字节,方面暂无回应,据Trustmobile的数据显示,2021年Q1,今日头条的MAU超2.8亿,但根据极光数据提供的日均新增用户数据显示,2019年Q3、2020年Q2和2020年Q3的日均新增用户速度,在相继减缓,2020年Q3的日均新增用户,数同比减少54.3万,增长停滞,甚至下滑,这为今日头条的发展前景带来压力与挑战,今日头条此番将要推出的两项新业务,与其说是开辟新的,战场,纵向扩展领域,不如说是力图通,过新业务将用户留存在自己的领地,以此增加实力站稳脚跟,随着互联网流量见顶,居安思危的的今日头条再次出击,选择发展多元化业务,今日,头条再出击,今日头条于2012年3月创,建,同年8月发布第一个版本,这是一款基于数据挖掘的推荐引擎产品,为用户推荐信息、提供连接人与信息的产品,作为抖音出现之前,张一鸣手,里的王牌产品,今日头条已经走了9,个年头,在互联网中不再是一款年轻的产品,今日头条现在的处境,就像当年腾讯的QQ,如何稳中求变,追求增长,成为了此类产品转型的重要目标,2019年是今日头条转型重,要的一年,迎来新的负责人朱文佳,这是一位从技术转型产品的负责人,对于今日头条CEO这一新的职位,朱文佳并不会那么轻松,此时的他面对的是今日,头条DAU和用户量增长放缓,的压力,朱文佳在接受《第一财经》的采访中,对今日头条增速放缓表示认同:早期今日头条增长速度的确比较快,用户量一年涨三千万到四千万,最近一,两年增长速度的确慢下来了,但总体曲线较为平稳,朱文佳称头条内部已经正视这个问题,事实上,在朱文佳担任今日头条CEO的这段时间,今日头条从产品/业务到内容,再到多生,态布局,都做了多方面的调整,Tech星球梳理发现,在朱文佳任期内,推出了7个产品,涉及搜索、内容、百科三大业务,不难看出,今日头条仍然保留着中心化的思维,这些产品都沿,袭着今日头条的头衔,但这些业务与此前推出的“头条博客”、“头条军事”等以内,容细分来划分有所区别,而是以用户画像进行划分,譬如,头条极速版针对,下沉市场用户,专业版针,对年轻的深度阅,读用户" const textList = [text1.split(',')] //整个画布对象 class CanvasBarrage{ constructor(options={}){ let video = document.querySelector('video') let canvas = document.querySelector('.wrapper-canvas'); if(!canvas || !video)return;
this.video = video; this.isPaused = true; this.canvas = canvas;
this.canvas.width = video.offsetWidth //onload后调用 this.canvas.height = video.offsetHeight - 60 //减去控制台高度 this.ctx = canvas.getContext('2d'); //获取画笔 this.canvas.width = video.clientWidth; //js设置canvas同video元素等高; this.canvas.height = video.clientHeight;
let defaultOptions = { fontSize: 20, color:'#000', speed: 2, opacity: 0.9, dataList:[] }; //合并对象: 1参是合并到的目标对象,后面的都是来源对象,合并到this实例对象中; //合并对象到实例对象中; option={},没有传就是为空,合并的就是defaultOptions Object.assign(this, defaultOptions, options); //存放所有弹幕 this.barrages = this.dataList.map(currentObj=>new Barrage(currentObj,this) ); let tempBarrage = this.barrages.sort((a,b)=>{ if(a.time < b.time) return -1 else return 1 }) console.log(tempBarrage) this.render(); } render = ()=>{ //渲染画布 //第一次先进行清空操作:( x,y, width,height) this.ctx.clearRect(0, 0, this.canvas.width, this.canvas.height); this.renderBarrage();//渲染所有弹幕
if(this.isPaused === false){ //递归渲染 //回调函数的this必须用bind,否者指向window; requestAnimationFrame( this.render.bind(this) ); //<--必须传一个回调 //这里用requestAni函数比用setInterval还渲染流畅很多 } }
renderBarrage = ()=>{ //取出每个弹幕,判断时间和视频的事件是否符合,符合就执行渲染此弹幕 let time = this.video.currentTime; this.barrages.forEach(currentBarrage=>{ if(!currentBarrage.flag && time >= currentBarrage.time){ //当视频播放时间等于或大于当前弹幕时间 if(!currentBarrage.isInited){ //初始化,再进行绘制 currentBarrage.init(); }
currentBarrage.x -= currentBarrage.speed; currentBarrage.currentRender(); //渲染此条弹幕
if(currentBarrage.x <= currentBarrage.width*-1){ currentBarrage.flag = true; //当此条弹幕的x位置小于等于弹幕宽度 }; }; }); }
addBarrage = (obj)=>{ this.barrages.push( new Barrage(obj, this) ); }
reset(){ this.ctx.clearRect(0, 0, this.canvas.width, this.canvas.height);
let time = this.video.currentTime; this.barrages.forEach(currentBarrage=>{
currentBarrage.flag = false;
if(time <= currentBarrage.time){ currentBarrage.isInited = false; //重新初始化 }else{ currentBarrage.flag = true; //其他项目部渲染 }; }) } } //每一条弹幕对象 class Barrage{ constructor(currentObj, contextObj){ this.value = currentObj.value; this.time = currentObj.time; //value & time 是弹幕必传值 this.contextObj = contextObj; this.isInited = false; this.flag = false; //如果没有传opacity就取defaultOptions的opacity; this.opacity = currentObj.opacity || this.contextObj.opacity; this.color = currentObj.color || this.contextObj.color; this.speed = currentObj.speed || this.contextObj.speed; this.fontSize = currentObj.fontSize || this.contextObj.fontSize; }
init = ()=>{ //初始化此条弹幕: 宽高,位置; //求此条弹幕的宽度,目的是用来检验当前是否还需要继续绘制 let span = document.createElement('span'); span.innerText = this.value; span.style.fontSize = this.fontSize +'px "Microsoft Yahei" '; span.style.position = 'absolute'; document.body.appendChild(span);
this.width = span.clientWidth; this.height = span.clientHeight; //span元素高度就是fontSize高度。span没有padding,剩下内容就只有fontSize高度支撑。 document.body.removeChild(span); //获得此条弹幕高&宽,再从页面中删除。
this.x = this.contextObj.canvas.width; //此条弹幕出现在画布的x,y位置 this.y = this.contextObj.canvas.height * Math.random(); //随机高度
if(this.y < this.fontSize){ this.y = this.fontSize; } if(this.y > this.contextObj.canvas.height - this.fontSize){ this.y = this.contextObj.canvas.height - this.fontSize; }
this.isInited = true; }
currentRender = ()=>{ //渲染此条弹幕,画在画布上 this.contextObj.ctx.font = this.fontSize + 'px "Microsoft Yahei" '; this.contextObj.ctx.fillStyle = this.color; this.contextObj.ctx.fillText(this.value, this.x, this.y); } } </script> <script> let video = document.querySelector('video')
//创建一个弹幕对象 function shoot(value){ let barrage = { value: value, color: '#fff', time: Math.floor(Math.random() * video.duration), //弹幕展示的时间 speed:value.length * 0.5, //弹幕速度 弹幕越长 速度越快 fontSize:20, //字体 opacity:0.8 //透明度 } return barrage }
window.onload=function(){ //随机初始化弹幕集合 let dataList = [] textList.forEach((t) => { dataList.push(shoot(t)) }) const realBarrage = new CanvasBarrage({dataList}) //每次播放都触发一次 进度条变更(currentTime)也会触发一次 video.onplaying = function () { console.log('开始播放') realBarrage.isPaused = false realBarrage.render() }; //进度条(currentTime)变更后 video.onseeked = function(){ console.log('seek执行后') realBarrage.reset(); } //监听视频状态 video.addEventListener('pause',()=>{ realBarrage.isPaused = true }) } </script> </body></html>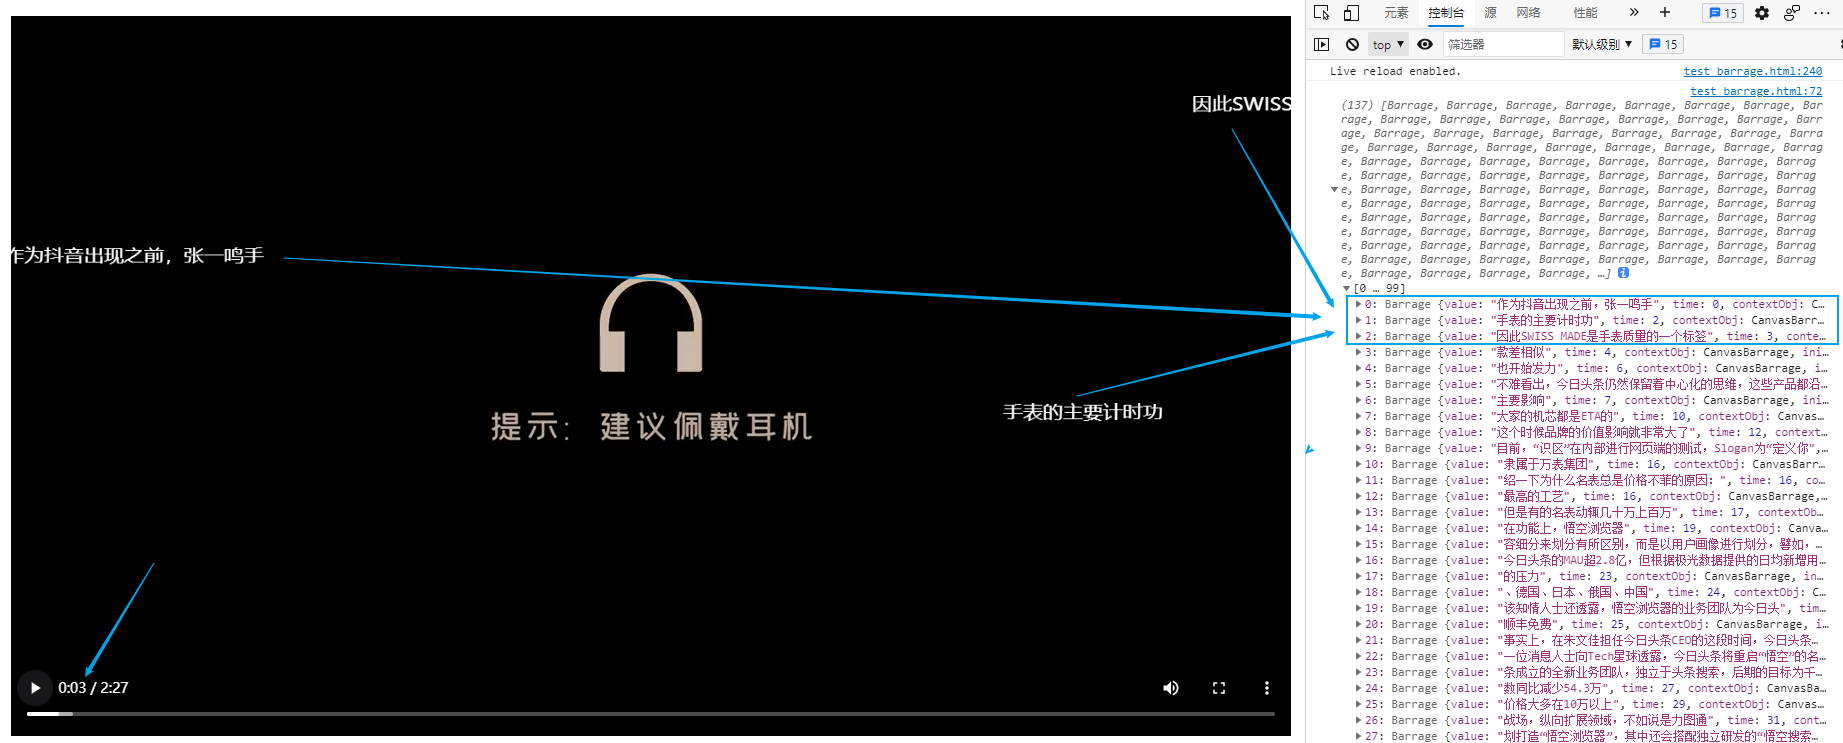
完整代码
logerlink/JSvideoDemo: JS video demo (github.com)
使用github文件资源请参考:github 文件资源访问 - 简书 (jianshu.com)